I got my inspiration from this Lowe's video on youtube.
This is what the area looked like after pulling out all of the shrubs, trees and lots and lots of weeds. After pulling out everything possible, I covered the area with weed blocking fabric:

You can kind of see the puffiness of the fabric. That's because I didn't put anything down over the fabric immediately and the weeds started to grow underneath. I had to pull back the fabric and pull the weeds AGAIN. Moral of the story is: be prepared to put mulch or stone on the fabric within a few days after putting the fabric down.
Here's another shot of the area after some more weed pulling:

I also planned to get rid of the weeds and putting more fabric and mulch down in the area of the above photo to the right hand side.
I decided to fill the area with river rocks and put the fire pit in the center. I ordered the river rocks and the nursery dumped 4 yards of rocks in my driveway:

Doesn't seem like too much work to move these rocks to the backyard, right? W-R-O-N-G! This was hard work! I had to shovel the rocks into my trusty wheelbarrow then go all the way around to the back with a very HEAVY load and dump it into the bed. I did this like a
The bed started to come along. I was generous with a 2" to 3" depth of the rocks. I didn't want any weeds poking through.


Now it was time to get started on the fire pit. I went down to HD and bought supplies: 52 wall stones, 4 bags of leveling sand and four 24"square cement pavers.
I should have bought 6 bags of leveling sand because the area was not very level but I had a leftover bag of all purpose sand I used beneath the good leveling sand.
Here is the all purpose sand:

And below is the leveling sand, which worked very well:

I dumped the sand onto my marked area for the fire pit and leveled it with a 2 by 4:

I used a level on the 2 by 4 to make sure it was good to go, but it was getting dark and I was losing patience so I crossed my fingers and went ahead and started building the fire pit without having a perfectly level base.

After 4 of the large pavers were set in the sand, I filled in the gaps with more sand and tried to make the pavers as level as possible.
I bought this fire pit kit to use on top of the stones after it was built.


As you can see, night had fallen and I was getting cranky but I was on a mission to at least complete the fire pit.

It wasn't easy. There had to be gaps in the stone. I had to get over this and lined up the stones and fit them together as well as I could.

See the major gap in the above photo? I had to play around with it a bit to get it right.
I think it turned out fine the next morning:


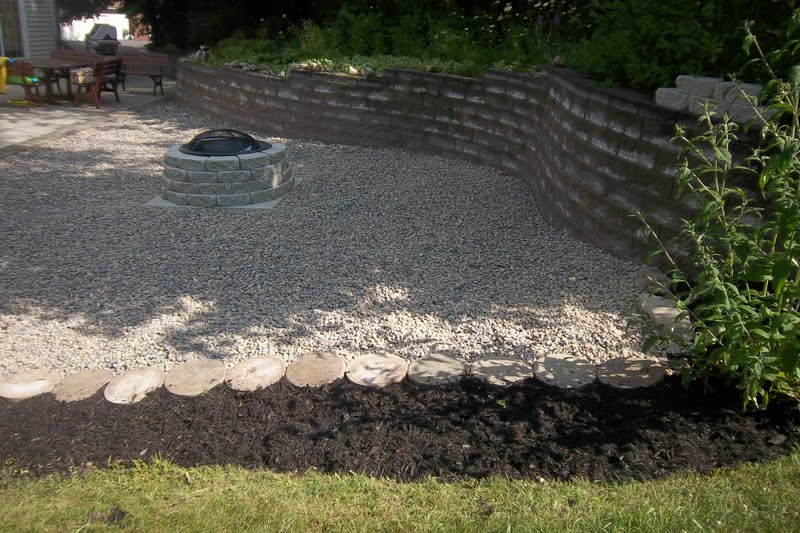
Overall I'm happy with our new fire pit. Now I'm planning to put planters in the bed to soften up the area along with seating for the fire pit. Stay tuned to see it all 'dolled up'!
Joining Centsational Girl's Garden Link Party!
:)
How funny, I just did the exact same thing over the weekend and posted it too. :o) Yours turned out good. What a job though, eh?! Not fun, but the end result is so exciting!
ReplyDeleteThanks for your comment Mindy! Man was this hard, back breaking work! But you're right, it's all worth it in the end. We had a great fire after it was complete and making the smores made it all worthwhile. Enjoy yours too!
ReplyDeleteThis looks amazing! And time consuming! I'm so impressed with what you have done - an amazing transformation. I bet your sitting outside all the time now. Great job :)
ReplyDeleteThanks Arpi! Now I just have to find some seating. Won't you stop by and join us for an evening of toasted mmellows?
ReplyDeleteYou did a beautiful job on this! Just want to warn all your readers that some municipalities (like ours) do not permit fit pits, or burning of any kind except in a grill. You wouldn't want to do all that hard work and then get a citation and be told not use it. For the weeds, you might also consider some herbicidal soap sprays, gardener's vinegars or a flame weeder, particularly if they come up again through the gravel.
ReplyDeleteThe gaps in the pavers are good for the fire, it allows air to come and go keeping the fire nice and toasty and alive. BUT if you wanted to close the gap and make the pavers tight, you do what you did at first and then take a paver and score it all the way around to the size you need and then hit it with a chisel and hammer and it will break to the smaller size and you put it in the small gap. But it looks GREAT the way it is.
ReplyDelete