Pages

Sunday, October 30, 2011

Fall Ramblings

Fall is is not my favorite season.   This is mostly because summer is over (boo hiss) and we are heading into the cold winter.   BUT..........

This year I have a positive new outlook on the fall season.  This is largely due to the fact that I've taken up running in the woods.  Yes.  I feel one with nature and it feels great!  Now I can understand why my little sister would talk and sing to trees.  (Arp, you were ahead of your time).


Check out this beautiful waterfall below.  I plan on putting this photo in a frame and hanging it on one of my many blank walls.


This waterfall is in my very own town!  I had no idea.  Goes to show you that by trying something new (running for me) it can lead to other awesome perspectives.  But I digress.....more on running for a later post.......

Okay, now that I was psyched for fall:

We went apple picking:


And to the dairy farm to get pumpkins:


Oh....we had a blast at my brother's wedding:


Made a not-so-scary scarecrow:


Watched my son get a higher belt in Karate:


And got ready for Halloween:


All in all, a very fun Fall!  

Happy Halloween!


:)

Thursday, October 20, 2011

Homework Area in Family Room

Even if your kiddos have desks in their rooms, don't they always seem to do their homework in the kitchen or common area of the house?  Mine do.  Instead of having them fight over the kitchen table, I thought it would be nice to create a homework space in an unused corner of the family room.

This is the space I'm talking about (blue arrows):


There is a desk back there, but nobody uses it because the table lamps take up so much space.  So....lamps are craigslisted (should be a new word....maybe it already is) and I'm left with a desk and a blank wall.

I saw YHL had simply placed colored paper in white frames for their family room art.  Why couldn't I do the same?

So I did with this result:


I went down to Hobby Lobby to pick up some paper (AC Moore, Michael's or any craft store will do). Or you may just have some scrap booking paper lying around to use as your framed art.  I made sure I picked colors having my family room colors of blue/tan/white so I couldn't go wrong!

I had some Ikea frames but any white frames will do.  The chair is not staying.  I bought the lamp a while ago from Joss and Main and had it in my bedroom.  The lamp was a bit short for the space so I placed in on an old woven suitcase thing I had in the basement:


I put my mags and library books in the wall letter holder so it's off the kitchen counters!  Containing clutter is key for me!

Hopefully this corner will get more use now!


Do you have an unused space that could be put to use?

:)

Wednesday, September 21, 2011

Upstairs Hallway and Fake Wainscoting

Before and after pictures are the best.  Without further ado, here is the before of the hallway:

Before:


And After:


Every since we moved in, the wainscoting in the house did not make sense to me.  It was in the downstairs foyer area:


and continued up the stairs:


but then it just stops!  As you can see in the above photo, as soon as the stairs end, the wainscoting abruptly ends also.  It made total sense to continue it in the upstairs hallway:


Before:

After:


It looks so much better and here's how we did it.....

We actually faked it!  Instead of paneling the lower portion of the walls, we simply added the chair rail and created boxes out of molding, then painted it to simulate real wainscoting.

We had this tricky area where the chair rail ended:


So we ended up cutting the edge of this original end and lined it up with a new piece.  It came out okay in the end, but it took lots of caulk and wood filler to smooth up the edges which connected.  The moral of this story is:  If at all possible, make the chair rail 1 piece.  It is time consuming to line up the edges and make them match exactly without caulk or putty.

First, I measured 36" from the top end of the floor molding every 20" or so on the wall.  I drew a line with a level all around the hallway and taped it with painters tape so it would be easier to place the chair rail:


This is the hallway all taped up:


Then, we cut the chair rail into the exact pieces we would need for each wall.  This was tricky because we needed some 45 degree angles for the corners.  Luckily my husband knew how to do this with his miter box saw.


Then we used a nail gun to nail them all into place, using the painter's tape as our guide:


This was our result:


Now we needed to create the boxes (there's one I laid out in the above photo).

We used a 1.5" wood molding to match the existing molding downstairs.  Most of our boxed measured 16" high and 32" wide,  but depending on the wall, some of the boxes were smaller.  I measured, and drew with a level (the level is important here) the boxes to guide the placement.

I did not get all caught up in getting the same exact distance to separate the boxes.  I got as close as I could and if it looked okay after I drew the boxes on the wall, I went with it. 

Cutting the box molding:


Here are some boxes I laid out:


We nail gunned them into place and ended up with these boxes!


I now furiously worked with caulking the sides of the boxes and any gaps I could see.  After letting the caulk dry, I sanded it down to get ready for the paint.


I don't have any pics of me painting, but I used semi-gloss BM White Dove to match the rest of the trim in my house.

The painters tape came in handy with painting the chair rail.  Before pulling the tape off, I scored it with a box cutter in order to make a clean line:


The upstairs hallway finally flows with the rest of the hall!


Now all I have to do is decorate the hallway! 

:)

Sunday, July 24, 2011

My DIY Fire Pit with River Rocks

Ever since we moved in last summer, I've been wanting to clear out our overgrown flower bed to create a fire pit area.  It's been a year and after 3 days of blood, sweat and tears....mostly sweat (and really no tears but a little bit of blood) I am happy to say I am done with the hard scape portion of the fire pit and surrounding area.

I got my inspiration from this Lowe's video on youtube.

This is what the area looked like after pulling out all of the shrubs, trees and lots and lots of weeds.  After pulling out everything possible, I covered the area with weed blocking fabric:


You can kind of see the puffiness of the fabric.  That's because I didn't put anything down over the fabric immediately and the weeds started to grow underneath.  I had to pull back the fabric and pull the weeds AGAIN.  Moral of the story is: be prepared to put mulch or stone on the fabric within a few days after putting the fabric down.

Here's another shot of the area after some more weed pulling:


I also planned to get rid of the weeds and putting more fabric and mulch down in the area of the above photo to the right hand side.

I decided to fill the area with river rocks and put the fire pit in the center.  I ordered the river rocks and the nursery dumped 4 yards of rocks in my driveway:


Doesn't seem like too much work to move these rocks to the backyard, right?  W-R-O-N-G!  This was hard work!  I had to shovel the rocks into my trusty wheelbarrow then go all the way around to the back with a very HEAVY load and dump it into the bed.  I did this like a zillion hundred times.  It was tough on my back and my legs.  But as my sister pointed out, it's like cross training!

The bed started to come along.  I was generous with a 2" to 3" depth of the rocks.  I didn't want any weeds poking through.

Notice how I have the future fire pit marked in the center of the above photo.


The river rocks in the above photo were very dusty and dirty.  I hadn't washed them off yet, but I liked how this stepping stone looked set in the rocks.

Now it was time to get started on the fire pit.  I went down to HD and bought supplies:  52 wall stones, 4 bags of leveling sand and four 24"square cement pavers.

I should have bought 6 bags of leveling sand because the area was not very level but I had a leftover bag of all purpose sand I used beneath the good leveling sand.

Here is the all purpose sand:


And below is the leveling sand, which worked very well:


I dumped the sand onto my marked area for the fire pit and leveled it with a 2 by 4:


I used a level on the 2 by 4 to make sure it was good to go, but it was getting dark and I was losing patience so I crossed my fingers and went ahead and started building the fire pit without having a perfectly level base.


In the above photo, to the right, you can see the fire pit blocks I used.  It was very tedious getting them in and out of the car!

After 4 of the large pavers were set in the sand, I filled in the gaps with more sand and tried to make the pavers as level as possible.

I bought this fire pit kit to use on top of the stones after it was built.

I set the dome shaped protection screen in the center of the pavers to guide me and I started to build!


As you can see, night had fallen and I was getting cranky but I was on a mission to at least complete the fire pit.


It wasn't easy.  There had to be gaps in the stone.  I had to get over this and lined up the stones and fit them together as well as I could.


See the major gap in the above photo?  I had to play around with it a bit to get it right.  

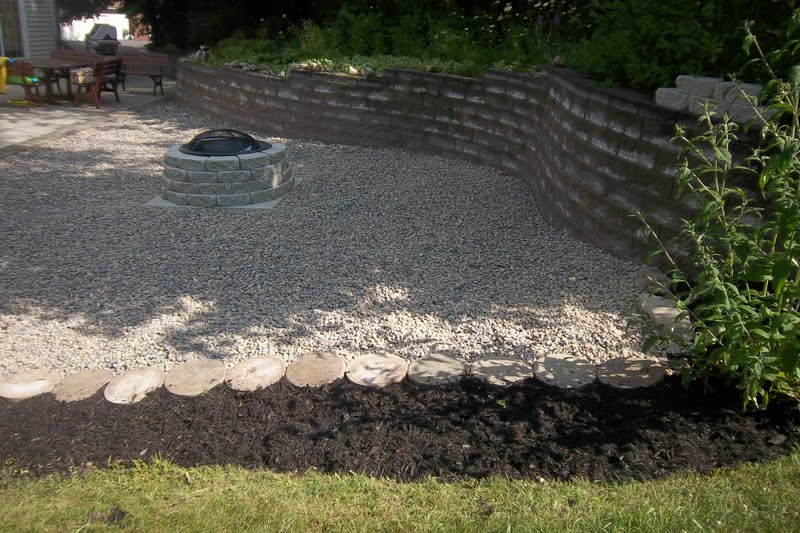
I think it turned out fine the next morning:


 This was the section I took out the weeds and put in the mulch.  I separated the rocks with stepping stones that were in the old flower bed.

Overall I'm happy with our new fire pit.  Now I'm planning to put planters in the bed to soften up the area along with seating for the fire pit.  Stay tuned to see it all 'dolled up'!

Joining Centsational Girl's Garden Link Party!

:)


Saturday, July 23, 2011

Brick Front Steps - Complete Makeover!

Our front brick steps were in major disrepair.  The previous owners patched it back together with mortar and cement, but after this winter it was coming apart.  It was dangerous for people coming up to the house and looked like a wreck. 

I don't have a before photo, but it looked something like this:

source: google images


Okay, it wasn't this bad, but it was close.  Many of the bricks were loose and the end bricks were falling off.  The steps were super steep to boot, so it was tough for guests to navigate their way to our front door....not an ideal welcome.

I had to hire out for this.  I am not a mason, although I do like that name for a boy.  I asked around and got a few estimates.  I liked one mason named Red Hutson right away and he gave me the best price and came highly recommended..Yay!   

The re-construction took longer than Red thought.  It ended up needing more new bricks because the old ones were disintegrating.  Also, the base was very shoddily done in the first place so Red had to re-do the base also.  

Okay, in the end it turned out great and I'm so happy with the result:


It looks like it's been this way all along!  Fits in perfectly.  And the limestone slates clean up the brick pavers and will make it easier to clean off the snow.  Not to mention people won't trip coming up the steps!

Red even took out the pavers on the landing and put a limestone slate so the steps blend nicely with the landing:


Now, what color should I paint the front door?


A safe and nice looking set of front brick and limestone stairs make me smile!


:)