Pages

Friday, December 2, 2011

Gallery Staircase

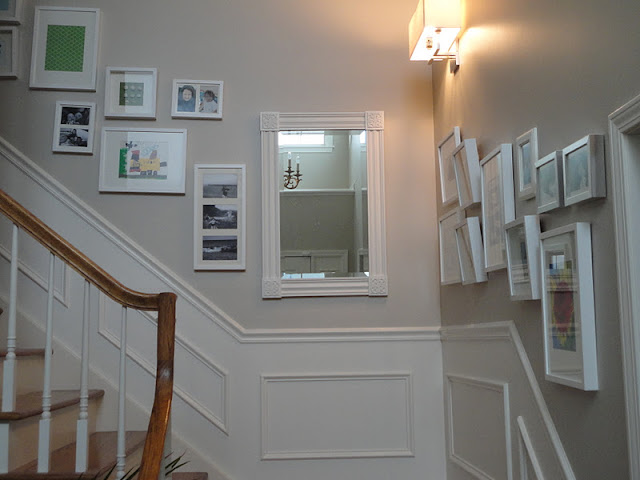
The walls going up the stairs are finally covered with some frames!

After painting the walls and picking up some white frames of assorted sizes at Ikea and Target I was ready to plan out where the frames would go.  After seeing this post on YHL I used newspaper and cut them out to the size of each frame and taped them on the walls.  This way I could move them around easily.

This is what it looked like with the newspaper up:


I kept switching the arrangement around.  It took me forever a few weeks to finally start hanging the up the actual frames!

So away we go with some before and afters of the same space:

Before:


After:


Before: 


After:


In the picture below, you can see a problem I was having hanging some of the frames.  After hanging with the wire, the shadow box type frames were not sitting well against the wall.  See the space between the frame and the wall?


To fix this little problem, I first used package tape on the wire, but that did not hold for more than 2 days.  I turned to Gorilla Tape!


And simply taped up the wire:


So now it sits nicely against the wall.  Take a look:

Before: spacey


After:  not so spacey


It's been a month now and the Gorilla Tape is still holding up (literally).


Thanks for looking at my new staircase gallery!


PS- all the items in the frames are either photos or the kids' artwork or stuff I put together from meaningful items I had at home.  For example, the kids' birth announcements.  I tried to coordinate the colors and the white frames tie it all together.....or so I'd like to think.

:)

Sunday, October 30, 2011

Fall Ramblings

Fall is is not my favorite season.   This is mostly because summer is over (boo hiss) and we are heading into the cold winter.   BUT..........

This year I have a positive new outlook on the fall season.  This is largely due to the fact that I've taken up running in the woods.  Yes.  I feel one with nature and it feels great!  Now I can understand why my little sister would talk and sing to trees.  (Arp, you were ahead of your time).


Check out this beautiful waterfall below.  I plan on putting this photo in a frame and hanging it on one of my many blank walls.


This waterfall is in my very own town!  I had no idea.  Goes to show you that by trying something new (running for me) it can lead to other awesome perspectives.  But I digress.....more on running for a later post.......

Okay, now that I was psyched for fall:

We went apple picking:


And to the dairy farm to get pumpkins:


Oh....we had a blast at my brother's wedding:


Made a not-so-scary scarecrow:


Watched my son get a higher belt in Karate:


And got ready for Halloween:


All in all, a very fun Fall!  

Happy Halloween!


:)

Thursday, October 20, 2011

Homework Area in Family Room

Even if your kiddos have desks in their rooms, don't they always seem to do their homework in the kitchen or common area of the house?  Mine do.  Instead of having them fight over the kitchen table, I thought it would be nice to create a homework space in an unused corner of the family room.

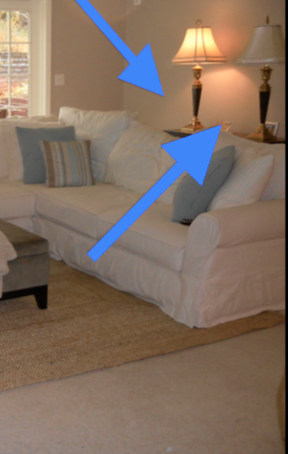
This is the space I'm talking about (blue arrows):


There is a desk back there, but nobody uses it because the table lamps take up so much space.  So....lamps are craigslisted (should be a new word....maybe it already is) and I'm left with a desk and a blank wall.

I saw YHL had simply placed colored paper in white frames for their family room art.  Why couldn't I do the same?

So I did with this result:


I went down to Hobby Lobby to pick up some paper (AC Moore, Michael's or any craft store will do). Or you may just have some scrap booking paper lying around to use as your framed art.  I made sure I picked colors having my family room colors of blue/tan/white so I couldn't go wrong!

I had some Ikea frames but any white frames will do.  The chair is not staying.  I bought the lamp a while ago from Joss and Main and had it in my bedroom.  The lamp was a bit short for the space so I placed in on an old woven suitcase thing I had in the basement:


I put my mags and library books in the wall letter holder so it's off the kitchen counters!  Containing clutter is key for me!

Hopefully this corner will get more use now!


Do you have an unused space that could be put to use?

:)

Wednesday, September 21, 2011

Upstairs Hallway and Fake Wainscoting

Before and after pictures are the best.  Without further ado, here is the before of the hallway:

Before:


And After:


Every since we moved in, the wainscoting in the house did not make sense to me.  It was in the downstairs foyer area:


and continued up the stairs:


but then it just stops!  As you can see in the above photo, as soon as the stairs end, the wainscoting abruptly ends also.  It made total sense to continue it in the upstairs hallway:


Before:

After:


It looks so much better and here's how we did it.....

We actually faked it!  Instead of paneling the lower portion of the walls, we simply added the chair rail and created boxes out of molding, then painted it to simulate real wainscoting.

We had this tricky area where the chair rail ended:


So we ended up cutting the edge of this original end and lined it up with a new piece.  It came out okay in the end, but it took lots of caulk and wood filler to smooth up the edges which connected.  The moral of this story is:  If at all possible, make the chair rail 1 piece.  It is time consuming to line up the edges and make them match exactly without caulk or putty.

First, I measured 36" from the top end of the floor molding every 20" or so on the wall.  I drew a line with a level all around the hallway and taped it with painters tape so it would be easier to place the chair rail:


This is the hallway all taped up:


Then, we cut the chair rail into the exact pieces we would need for each wall.  This was tricky because we needed some 45 degree angles for the corners.  Luckily my husband knew how to do this with his miter box saw.


Then we used a nail gun to nail them all into place, using the painter's tape as our guide:


This was our result:


Now we needed to create the boxes (there's one I laid out in the above photo).

We used a 1.5" wood molding to match the existing molding downstairs.  Most of our boxed measured 16" high and 32" wide,  but depending on the wall, some of the boxes were smaller.  I measured, and drew with a level (the level is important here) the boxes to guide the placement.

I did not get all caught up in getting the same exact distance to separate the boxes.  I got as close as I could and if it looked okay after I drew the boxes on the wall, I went with it. 

Cutting the box molding:


Here are some boxes I laid out:


We nail gunned them into place and ended up with these boxes!


I now furiously worked with caulking the sides of the boxes and any gaps I could see.  After letting the caulk dry, I sanded it down to get ready for the paint.


I don't have any pics of me painting, but I used semi-gloss BM White Dove to match the rest of the trim in my house.

The painters tape came in handy with painting the chair rail.  Before pulling the tape off, I scored it with a box cutter in order to make a clean line:


The upstairs hallway finally flows with the rest of the hall!


Now all I have to do is decorate the hallway! 

:)